

Monogram T-shirt using Freezer Paper {Handmade Holiday}

My 6 year old made little monogram PJ shirts for his siblings this year. He is super proud of them and had a great time making them. The shirts were easy to make and inexpensive. I got the two white shirts at Walmart for $2.50 each and the little girl blue one for $4.

Paint Chip Bookmarks {Handmade Holiday}
Do your kids give each other gifts? Our older kids that can earn money buy their little brother and sister something and I help the little ones make something. We used to give the kids a set amount of money and take them to the store to pick stuff out but that is expensive if you have 4 kids and I don't think they learn much about giving if they are spending your money!
Our youngest is 3 and this year she made bookmarks for her brothers. We made some out of glitter paper and a few out of leftover paint chips. You could use cardstock or any kind of stiff paper. She helped wrap them (in bright pink birthday paper LOL) and is so excited to give them to her brothers.
I'm going to let the pictures explain themselves today. My kids are all out of school and I want to go do something fun with them!

Jane Austen journal bag {Handmade holiday}
Are you a Jane Austen fan? I am! Love her books and the movies made from them. Whenever my husband deploys I always spend the first day watching the really long Pride and Prejudice and sulking. Then the next day I suck it up and continue on with life. My sister in law loves Jane Austen too and I found this cute little 5 year Jane a Day journal for her. 5 year journals are the BEST thing for busy Moms. There is only a spot to write a couple lines everyday. No pressure to write tons! The little bag fits a kindle too so it would be a fun little bag for that as well.

Ana White Doll Bunkbed {Handmade holiday}
This is one of my favorite things we made this year. My husband and I built an Ana White Doll bunkbed for our daughter. I love it so much I kind of want to keep it for myself.
My biggest tip is to paint the boards after you cut them but before you assemble the bunk bed. The building wasn't too bad but painting between all the little slats took forever. Especially when I had to do it at night in the freezing cold garage so it stayed a secret. The paint is Behr's Refreshing Pool.
The adorable doll my Grandma made for her. My Grandma is SUPER talented and made me a very similar doll when I was little. The doll pillow and blanket tutorial I posted yesterday.

Doll Quilt & Pillow Tutorial {Handmade Holiday}

Do you have a little girl on your Christmas list? I know lots of little girls that love baby dolls and can always use some blankets to wrap their baby up. So today I have a little tutorial for a doll blanket and pillow! This is a great starter sewing project since it's all straight stitching and pretty basic.

Craft kit in a Jar {Handmade Holiday}

So excited to show you the little craft jars that I made for my nieces! These were so easy and inexpensive since most of what I used to fill them came from my craft room. They would be a make a great little stocking stuffer too since you can choose the size.

DIY Road for Play Cars {handmade holiday tutorial}
Are you almost ready for Christmas? Only 13 more days! I made a cute little felt road for my car obsessed nephew and I'm so excited to show you how to make one too! Including the cars this project costs about $10. Less if you use fabric from your stash! This would be such a fun toy for airline travel or even for keeping quiet during church.

Simple Stool {Handmade Holiday}
The little kids art table that we built a few days ago needed a spot to sit. So we built a simple stool using Ana-White plans. It's perfect for kids but is also a great height for resting drinks if you have an adirondack chair on your deck or even as a plant holder for the front porch. I painted it my favorite Aqua-Refreshing Pool by Behr. My favorite part was that it was free since we built it from scraps! Are you building some fun Christmas surprises?

Book Bin {Handmade Holiday}
They turned out so cute. I personalized them with vinyl letters cut out with my silhouette machine. I even added a little magnetic strip that I got at Ikea to my nephews for cars and trains (the matchbox cars have to be completely metal for them to stick). Now they will have a little spot by their bed to keep their favorite books.

Kids Art Table {Handmade Holiday}
My goal this year was to have a desk for each of my kids. I really think it inspires creativity and encourages art activities if kids have their own special spot. So we built our preschool daughter a little art table using Ana-White kids table plans.
The only changes I made to the original table was adding 1x3 stretcher to the bottom of the legs for additional stability. We had to buy a 2x2 for this project but everything else was scraps. The top is all 1x3 and 1x4 scraps. Total cost for E's art table was $3 for the 2x2. I would guess that if you had to buy all the wood it would be $10-15 which is pretty great deal for an all wood table!
I painted the table with 2 coats of Dover White from Sherwin Williams.

Trug {Handmade Holiday}
Since I love handmade gifts so much I decided to do a little handmade holiday series. Just a few ideas that we are making. This week is all stuff to build! All the projects cost less than $10.
To start the week off I have a cute little trug. Built with plans from Jaime at That's my Letter. It was built from scraps in our garage but if you bought the wood specifically for this project it would be less than $10! I painted it with the leftover paint from the skateboard desk, the color is Corsair by Better Homes and Garden. The name is just white vinyl cut out with my silhouette with polycrylic over the letters. My nephew is totally into Handy Manny and loves to haul all his treasures around so I think he will love it!

Read more »
To start the week off I have a cute little trug. Built with plans from Jaime at That's my Letter. It was built from scraps in our garage but if you bought the wood specifically for this project it would be less than $10! I painted it with the leftover paint from the skateboard desk, the color is Corsair by Better Homes and Garden. The name is just white vinyl cut out with my silhouette with polycrylic over the letters. My nephew is totally into Handy Manny and loves to haul all his treasures around so I think he will love it!

Christmas Tree {ruffled garland tutorial}
I'm getting so excited for Christmas especially as I get more of the work done! I feel like it's hard to be the Mom and still enjoy the holidays. It's hard to get all the decorating and shopping finished plus orchestrate all the traditions and still feel fun and relaxed.

Read more »

Simple Wood Christmas ornaments {Christmas tutorial}
I have this problem every Christmas. I pull out ALL the Christmas boxes with the intention of just setting it all up and then after I get it all unpacked I decide I hate it all and want to make new stuff. Last year it was a bunch of Salt dough ornaments. This year it's wood. So here is a simple tutorial so you can make your own.
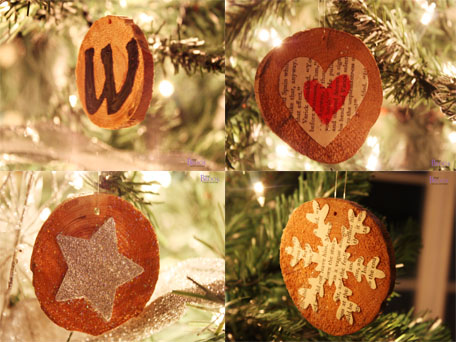
Read more »

Easy Log Coasters {Nesting tables}
My husband and I just built some new nesting tables using Ana-White plans. LOVE them! I needed something to protect the newly painted finish from my messy, messy family. So I made some almost free coasters. Free-my favorite word.

Read more »

Christmas Mantle
I have an explosion of Christmas at my house. Every year I get the boxes out of the basement and think I can keep things organized while we decorate. About 5 minutes later my kids have "helped" find all the ornaments and there is stuff EVERYWHERE!!
Fun times. So today I'm showing you the one clean, decorated part of the house. The mantle. The only place my mirror and mantle would fit in our new house was the stairway. Kind of an odd place for a mantle but sometimes you take what you can get!
Have you started decorating for Christmas yet?

Read more »
Fun times. So today I'm showing you the one clean, decorated part of the house. The mantle. The only place my mirror and mantle would fit in our new house was the stairway. Kind of an odd place for a mantle but sometimes you take what you can get!
Have you started decorating for Christmas yet?

Water 4 Christmas {doll pillows and blankets}
/
Blog
The Water4Christmas etsy shop is opening today!
You can shop for Christmas gifts and the money you spend goes to charity! How awesome is that? I made little doll pillows and blankets. The backs are soft minky and the fronts are my favorite designer fabric in cotton. Perfect Christmas gift!
Amy Butler doll blanket and pillow
Heather Bailey doll blanket and pillow
Patty Young doll blanket and pillow
You can also just give water!

Read more »
You can shop for Christmas gifts and the money you spend goes to charity! How awesome is that? I made little doll pillows and blankets. The backs are soft minky and the fronts are my favorite designer fabric in cotton. Perfect Christmas gift!
Amy Butler doll blanket and pillow
Heather Bailey doll blanket and pillow
Patty Young doll blanket and pillow
You can also just give water!

Turkey Napkins {tutorial}
I don't have special Thanksgiving dishes and my regular dishes are aqua. Not really Thanksgiving colors! Instead of buying new dishes I decided to whip up some cute turkey napkins which would coordinate with what I already have.
I did "invest" $1 each on new silver chargers!

Read more »
I did "invest" $1 each on new silver chargers!

Turkey Mantle {Thanksgiving}
Are you ready for Thanksgiving? I can hardly wait for the potatoes, they are my favorite.
My kids helped me give the mantle a little Thanksgiving spruce up. The kids made all of the Turkey crafts. Ellie helped make the handprint garland and gobble art (I did the letters on the silhouette). We built the mantle and the mirror earlier this year and still love them. Love how cheerful and colorful it turned out!

Read more »
My kids helped me give the mantle a little Thanksgiving spruce up. The kids made all of the Turkey crafts. Ellie helped make the handprint garland and gobble art (I did the letters on the silhouette). We built the mantle and the mirror earlier this year and still love them. Love how cheerful and colorful it turned out!

Three Easy Turkey Crafts {Thanksgiving}
Every year I do a couple little turkey crafts with my kids. My older boys still participate. Though their turkeys each have at least 10 eyes and look more like aliens then turkeys.
This year we made a handprint turkey, pinecone turkey and yarn ball turkey. All pretty easy and took less than 10 minutes each. I used a hot glue gun to glue them together and my older kids helped my little ones. If you wanted a bunch of kids to do these you would want to use elmers or some other kid safe glue that would be safe and not get anyone burned!

Pallet Shelf gallery wall {teen boy bedroom}
I just love gallery walls. I think I have one in every room of my house! This is the one in my teen son's bedroom. The one with the Rustic headboard and Farmhouse desk.

Read more »

Easy curtain spruce up {double panels}
I bought some basic navy curtain panels for our little guy's Star Wars bedroom. We hung them up and they just looked sad and skimpy. I left them alone for a few months so I could think about what to do. Then I saw this master bedroom on the Nate show where they doubled up the curtain panels to give them a fuller look. So I thought I'd give it a try.
Here is the before. The curtains were fine just seemed too skinny for such a wide window.

Read more »
Here is the before. The curtains were fine just seemed too skinny for such a wide window.

Lego Minifig Storage {organizing}
Do you have lego storage problem? With three boys we have a zillion legos! My 6 year old is obsessed with the little lego minifigs and he likes to be able to see them at all times. No putting the little men in a storage bin in the closet.
So I hung them on his wall right as his level so he can play with them and the little guys can be decorations too! Yes someday I will finish his gallery wall and put pictures of people we know in the picture frames!

Read more »
So I hung them on his wall right as his level so he can play with them and the little guys can be decorations too! Yes someday I will finish his gallery wall and put pictures of people we know in the picture frames!

Rustic Headboard {aged wood}
Our boys have always shared a room and had bunk beds. When we moved we gained an extra bedroom. We are using this space for our teen's bedroom and a room for guests. We bought a Queen bed set but it needed a headboard. So Ana-White to the rescue. Love her plans.

Read more »

Drop cloth curtains {tutorial}
/
Blog,
curtains,
drapes,
drop cloth,
Sewing,
teen bedroom
I usually use drop cloths for painting but I've seen some adorable curtains made out of drop cloths all over blogland in the past year. I love the rustic look of them so I knew they would be perfect for my teenager's room. Plus they are a really economical way to get a lot of fabric.

Read more »

Playroom Tour
Welcome to a little tour of our playroom! The playroom is a loft area right at the top of our stairs. Which is great because I can hear the kids quietly playing. I can also hear the toy battles before they turn into all out wars.
My kids range in age from 3 to 14 and they all love this room. The older boys mostly just use this room to play xbox or Wii. Almost all the stuff in this room is a previous project so I've already posted about it. All the links for the previous projects and the sources of everything are at the end of the post! Have fun on the tour.

Read more »
My kids range in age from 3 to 14 and they all love this room. The older boys mostly just use this room to play xbox or Wii. Almost all the stuff in this room is a previous project so I've already posted about it. All the links for the previous projects and the sources of everything are at the end of the post! Have fun on the tour.

Paint Chip Labels {Playroom organization}
/
Blog,
crafts,
labels,
organizing,
paint chip,
storage,
toys,
trofast
Now that Halloween is over I'm ready to start thinking about Thanksgiving...then after that Christmas! Can't skip Thanksgiving! I don't usually start Christmas shopping until after Thanksgiving but start cleaning up my house and throwing stuff away in November. Especially the toys, I purge the ones the kids don't play with and get some ideas of what stuff they may want. As part of organizing I thought I'd make some cute labels for the storage bins. The bins are part of the Trofast storage system from Ikea. They came unfinished and I primed and painted them.
The playroom is really colorful so I thought some paint chip labels would be perfect. With pictures and words so none of the kids have any excuses for not helping pick up!

Read more »
The playroom is really colorful so I thought some paint chip labels would be perfect. With pictures and words so none of the kids have any excuses for not helping pick up!

Easy Fairy costume {tutu dress tutorial}
/
Blog,
costume,
crafts,
fairy,
fast costume,
halloween,
Sewing,
tutu,
tutu dress
Are you ready for Halloween? I am a last minute costume Mom. When my older kids were tiny I would spend forever on costumes and start weeks in advance. Now my kids dig through the costume box the day before and I only make the little one a costume since the costume box is lacking in girl stuff.
E decided to be a fairy this year. Mostly because she really wanted the wings. The costume was way easy and I used leftover craft supplies that I already had in my craft stash. Tutu dresses are so easy to make and turn out SUPER pouffy which I think is fabulous.

I started out with about 100 yards of 6 inch tulle on rolls. I bought it at http://papermart.com a few years ago. The yellow roll had about 60 yards left on it and the pink was maybe 20 and the orange around 40. Your tulle amount is going to depend on how long you make your dress and how pouffy you want it. E is 3 and her dress is 24 inches long. You are also going to want a little strip of elastic, a piece of ribbon for the neck tie and whatever embellishments you want to decorate your dress.

Measure around the child's chest where you want the top of the tutu dress and cut your elastic about an inch smaller than that. Then sew ends of elastic together so you have an elastic circle.

Cut your tulle the fast way by wrapping it around something so you just have to cut once. I used my 24 inch long quilting ruler.

Put your elastic around something so it's easier to attach the tulle. I used a binder. I like to double my tulle for maximum puffiness. So take two of the strips and fold them in half. Push them under the elastic.

Take the bottom ends and feed them over the elastic and through the little loop of tulle.

Pull down gently.

Gently tighten by pulling down and slide that loop over by the rest so they are smushed together. Repeat with the rest of the tulle.

Once you are happy with the amount of tulle on your elastic it's time to attach the ribbon for the neck tie/haltar. I cut a strip of ribbon about 3 feet long and just threaded it between two pieces of tulle.

Then tied it into a knot. Then when the dress is on your child you just put the ribbon over their shoulders and tie it to the elastic in the back. Or you could do a little halter and tie it behind their neck. The flowers on the front of the dress were super easy. They are just silk flowers from the craft store.

Cut the stems off and pull off the little green plastic thing that is usually on the back of silk flowers.

Snip the rest of the stem off right at the flower. Make sure to leave just a bit of the green and put a little dab of hot glue right there to hold the remaining stem to the back of the flower.

Then grab a alligator clip. I buy these at Sally's Beauty supply. They come in packs of 100 for around $5. Put a line on hot glue along the top.

Attach it to the back of the flower. Now you can attach to the flower to the front of the tutu dress and use for hair bows.

Ta-da! A fairy! The wings were from Target and the wand is just one of those little glow sticks from Walmart.
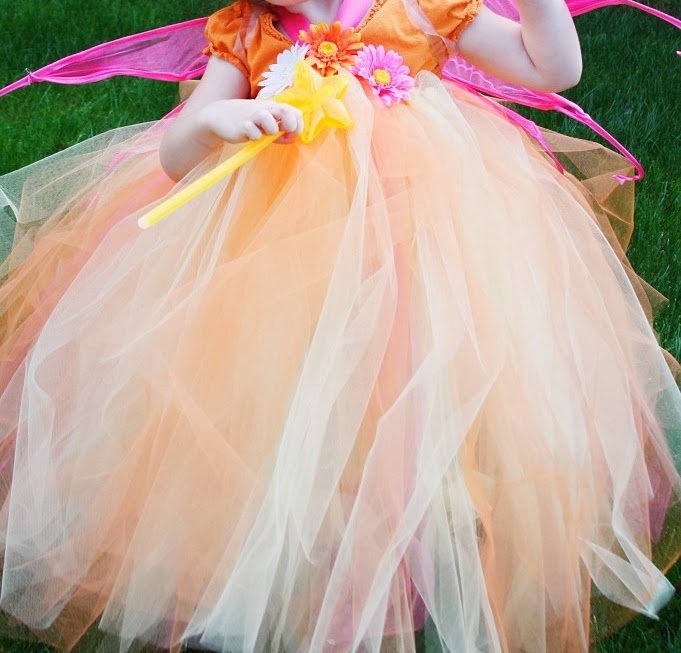
Love how pouffy it turned out.
Happy Halloween!
Read more »
E decided to be a fairy this year. Mostly because she really wanted the wings. The costume was way easy and I used leftover craft supplies that I already had in my craft stash. Tutu dresses are so easy to make and turn out SUPER pouffy which I think is fabulous.
I started out with about 100 yards of 6 inch tulle on rolls. I bought it at http://papermart.com a few years ago. The yellow roll had about 60 yards left on it and the pink was maybe 20 and the orange around 40. Your tulle amount is going to depend on how long you make your dress and how pouffy you want it. E is 3 and her dress is 24 inches long. You are also going to want a little strip of elastic, a piece of ribbon for the neck tie and whatever embellishments you want to decorate your dress.
Measure around the child's chest where you want the top of the tutu dress and cut your elastic about an inch smaller than that. Then sew ends of elastic together so you have an elastic circle.
Cut your tulle the fast way by wrapping it around something so you just have to cut once. I used my 24 inch long quilting ruler.
Put your elastic around something so it's easier to attach the tulle. I used a binder. I like to double my tulle for maximum puffiness. So take two of the strips and fold them in half. Push them under the elastic.
Take the bottom ends and feed them over the elastic and through the little loop of tulle.
Pull down gently.
Gently tighten by pulling down and slide that loop over by the rest so they are smushed together. Repeat with the rest of the tulle.
Once you are happy with the amount of tulle on your elastic it's time to attach the ribbon for the neck tie/haltar. I cut a strip of ribbon about 3 feet long and just threaded it between two pieces of tulle.
Then tied it into a knot. Then when the dress is on your child you just put the ribbon over their shoulders and tie it to the elastic in the back. Or you could do a little halter and tie it behind their neck. The flowers on the front of the dress were super easy. They are just silk flowers from the craft store.
Snip the rest of the stem off right at the flower. Make sure to leave just a bit of the green and put a little dab of hot glue right there to hold the remaining stem to the back of the flower.
Then grab a alligator clip. I buy these at Sally's Beauty supply. They come in packs of 100 for around $5. Put a line on hot glue along the top.
Attach it to the back of the flower. Now you can attach to the flower to the front of the tutu dress and use for hair bows.
Ta-da! A fairy! The wings were from Target and the wand is just one of those little glow sticks from Walmart.
Love how pouffy it turned out.
Happy Halloween!


