Showing posts with label crafts. Show all posts

Halloween Candle Tray {Scrapbooking Attitude}

Halloween is one of my favorite holidays.  I think because it's my Grandma's favorite holiday and she goes ALL out.  When I was growing up she would have the most elaborate Halloween parties every year with amazing decorations.  At the end of the party my Great Grandma would hand out GIANT popcorn balls that she handmade.  Delicious.  So I'm totally blaming my Grandma that I could only wait until the beginning of September to start pulling out the Halloween decor!  This year I have a new addition to my decor.  A Halloween candle tray made with a new product called Scrapbooking Attitude.


Read more »

DIY Nickel Tray

Hi friends!  Are your kids back at school?  Mine start Monday so I've been crazy busy running all over town trying to get all their supplies.  As well as replace all the pants and shoes that are too small!  I'm excited to have a few hours a day to get things in my house more organized.  Because after summer it's a MESS!!

I started out in my messy bedroom with some storage for my nightstand.  I totally have a container addiction.  Bins, buckets, baskets and trays.  I'm always optimistic that having more containers will magically make me more organized!  So today I'm sharing my love of trays with you and have a tutorial on how to make a tray out of nickels!


Read more »

Princess Mirror with DecoArt Glass Paint

Have you found anything great at yard sales this summer?  My daughter is obsessed with all things princess and dress up and I found the perfect mirror for her dress up corner.  It was only $5!  I even have a little tutorial to show you how I made the cute little crown with some of DecoArt's new glass paint!
Read more »

Blogging 2 Better Summer Challenge


Read more »

DIY Penny Tray {Dinosaur Boys Bedroom}

I've seen some really cool floors and countertops around the internet made out of pennies!  It looked like such a fun project that I thought I'd give it a try on something MUCH smaller than a counter or floor.  So I introduce you to my new penny tray.


Read more »

Zig Zag Wall Letter {Grey and Aqua Girls Bedroom}

I made a fun little wall letter for my daughter's bedroom. It was super simple and cost just a few dollars in supplies.


Read more »

Felt and Yarn Heart Wreath {Valentine's Day}

I'm still decorating for Valentine's Day.  You know that holiday a few short days away?  Yup that one!  My little gal and I are having a little party for her preschool friends so she's been helping me make the house extra festive.  Today we made a couple yarn wreaths.

Read more »

3-D Book page Heart Mobile {Valentine's Day}

I've been working on cleaning out my sewing/craft room the past few weeks.  My biggest problem is that as soon as I get stuff cleaned up a little I find something that others would classify as trash and have to turn it into something fun!  Today I'm going to show you how I made a heart mobile out of an old lampshade and a thrifted book.


Read more »

Monogram T-shirt using Freezer Paper {Handmade Holiday}


My 6 year old made little monogram PJ shirts for his siblings this year. He is super proud of them and had a great time making them. The shirts were easy to make and inexpensive. I got the two white shirts at Walmart for $2.50 each and the little girl blue one for $4.


Read more »

Paint Chip Bookmarks {Handmade Holiday}


Do your kids give each other gifts? Our older kids that can earn money buy their little brother and sister something and I help the little ones make something. We used to give the kids a set amount of money and take them to the store to pick stuff out but that is expensive if you have 4 kids and I don't think they learn much about giving if they are spending your money!

Our youngest is 3 and this year she made bookmarks for her brothers. We made some out of glitter paper and a few out of leftover paint chips. You could use cardstock or any kind of stiff paper. She helped wrap them (in bright pink birthday paper LOL) and is so excited to give them to her brothers.

I'm going to let the pictures explain themselves today. My kids are all out of school and I want to go do something fun with them!


Read more »

Craft kit in a Jar {Handmade Holiday}


So excited to show you the little craft jars that I made for my nieces! These were so easy and inexpensive since most of what I used to fill them came from my craft room. They would be a make a great little stocking stuffer too since you can choose the size.


Read more »

Simple Wood Christmas ornaments {Christmas tutorial}

I have this problem every Christmas. I pull out ALL the Christmas boxes with the intention of just setting it all up and then after I get it all unpacked I decide I hate it all and want to make new stuff. Last year it was a bunch of Salt dough ornaments.  This year it's wood. So here is a simple tutorial so you can make your own.


Read more »

Easy Log Coasters {Nesting tables}

My husband and I just built some new nesting tables using Ana-White plans.  LOVE them!  I needed something to protect the newly painted finish from my messy, messy family.  So I made some almost free coasters.  Free-my favorite word.


Read more »

Turkey Napkins {tutorial}

I don't have special Thanksgiving dishes and my regular dishes are aqua. Not really Thanksgiving colors! Instead of buying new dishes I decided to whip up some cute turkey napkins which would coordinate with what I already have.

I did "invest" $1 each on new silver chargers!

Read more »

Three Easy Turkey Crafts {Thanksgiving}

Every year I do a couple little turkey crafts with my kids. My older boys still participate. Though their turkeys each have at least 10 eyes and look more like aliens then turkeys.

This year we made a handprint turkey, pinecone turkey and yarn ball turkey. All pretty easy and took less than 10 minutes each. I used a hot glue gun to glue them together and my older kids helped my little ones. If you wanted a bunch of kids to do these you would want to use elmers or some other kid safe glue that would be safe and not get anyone burned!


Read more »

Paint Chip Labels {Playroom organization}

Now that Halloween is over I'm ready to start thinking about Thanksgiving...then after that Christmas!  Can't skip Thanksgiving! I don't usually start Christmas shopping until after Thanksgiving but start cleaning up my house and throwing stuff away in November.  Especially the toys, I purge the ones the kids don't play with and get some ideas of what stuff they may want. As part of organizing I thought I'd make some cute labels for the storage bins. The bins are part of the Trofast storage system from Ikea. They came unfinished and I primed and painted them.

The playroom is really colorful so I thought some paint chip labels would be perfect.  With pictures and words so none of the kids have any excuses for not helping pick up!


Read more »

Easy Fairy costume {tutu dress tutorial}

Are you ready for Halloween? I am a last minute costume Mom. When my older kids were tiny I would spend forever on costumes and start weeks in advance. Now my kids dig through the costume box the day before and I only make the little one a costume since the costume box is lacking in girl stuff.

E decided to be a fairy this year. Mostly because she really wanted the wings. The costume was way easy and I used leftover craft supplies that I already had in my craft stash.  Tutu dresses are so easy to make and turn out SUPER pouffy which I think is fabulous.


I started out with about 100 yards of 6 inch tulle on rolls.  I bought it at http://papermart.com a few years ago.  The yellow roll had about 60 yards left on it and the pink was maybe 20 and the orange around 40.  Your tulle amount is going to depend on how long you make your dress and how pouffy you want it.  E is 3 and her dress is 24 inches long.  You are also going to want a little strip of elastic, a piece of ribbon for the neck tie and whatever embellishments you want to decorate your dress.


Measure around the child's chest where you want the top of the tutu dress and cut your elastic about an inch smaller than that. Then sew ends of elastic together so you have an elastic circle.


Cut your tulle the fast way by wrapping it around something so you just have to cut once.  I used my 24 inch long quilting ruler.


Put your elastic around something so it's easier to attach the tulle.  I used a binder.  I like to double my tulle for maximum puffiness.  So take two of the strips and fold them in half. Push them under the elastic.


Take the bottom ends and feed them over the elastic and through the little loop of tulle.


Pull down gently.


Gently tighten by pulling down and slide that loop over by the rest so they are smushed together. Repeat with the rest of the tulle.


Once you are happy with the amount of tulle on your elastic it's time to attach the ribbon for the neck tie/haltar.  I cut a strip of ribbon about 3 feet long and just threaded it between two pieces of tulle.


Then tied it into a knot.  Then when the dress is on your child you just put the ribbon over their shoulders and tie it to the elastic in the back.  Or you could do a little halter and tie it behind their neck.  The flowers on the front of the dress were super easy.  They are just silk flowers from the craft store.


Cut the stems off and pull off the little green plastic thing that is usually on the back of silk flowers.


Snip the rest of the stem off right at the flower.  Make sure to leave just a bit of the green and put a little dab of hot glue right there to hold the remaining stem to the back of the flower.


Then grab a alligator clip.  I buy these at Sally's Beauty supply.  They come in packs of 100 for around $5.  Put a line on hot glue along the top.


Attach it to the back of the flower.  Now you can attach to the flower to the front of the tutu dress and use for hair bows.


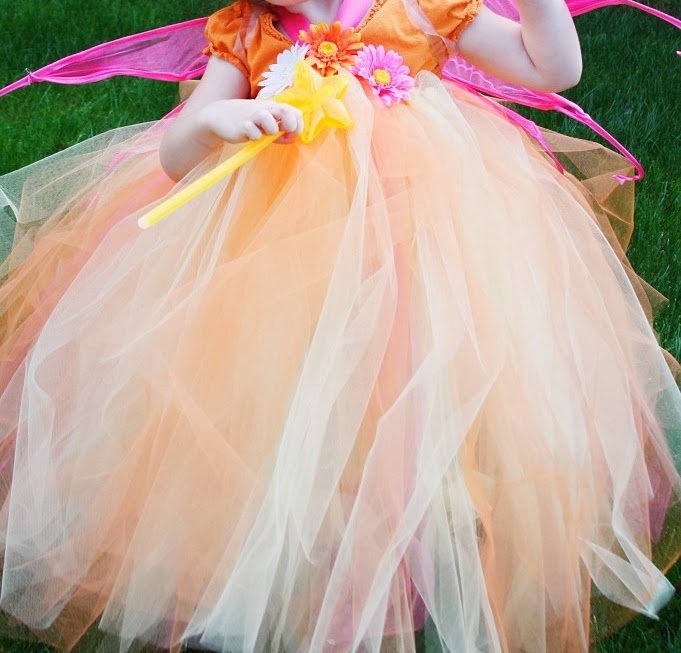
Ta-da!  A fairy!  The wings were from Target and the wand is just one of those little glow sticks from Walmart.


Love how pouffy it turned out.


Happy Halloween!
Read more »

Fall Coasters

I thought I'd show you how to make some easy Fall coasters.  They are super fun to have in your own house and great little gifts for friends or a hostess gift!

IMG_4197

Read more »

Magnetic Alphabet {tutorial}

One of my little ones is heading off to kindergarten this year.!  He's been practicing to write all his letters and starting to spell some easy words.  He does have a hard time remembering exactly what each letter looks like if it's not right in front of him so I thought some little letter magnets would help.  Plus it makes letters fun instead of work!

Gather your supplies.
-Alphabet-I just printed the letters in a word processing program.  My letters were 72 pt.
-Scissors
-Pen
-Magnets
-Mod podge
-Foam brush
-E6000 for magnets
-Clear disks-I bought these at Michael's in the Garden department.  They were $2.50 for a package of about 20.  Mine are about 1.5 inches in diameter but they come in lots of different sizes.

Magnetic Alphabet
Read more »
Powered by Blogger.
Back to Top